造你自己的 MyBatis 插件
插件
我们早已知道 MyBatis 自身支持客户端分页(RowBounds), 即从数据库获取全部目标数据,在内存中对结果集进行分页,虽然适用于不同数据库,但是数据量足够大时 Java 程序可能发生内存溢出;若采用数据库服务器端分页,即从数据库获取部分目标数据,例如向 MySQL 数据库发送使用了 LIMIT 或 OFFSET关键词的 SQL,还挺简单,可是直接使用 MyBatis 做数据库分页仍然有一些痛点:
- 重复编写分页、求总记录数、排序语句。
- 语法不同,不适用于其它数据库。
那不如改用 Hibernate ?还真不一定,国人偏爱 MyBatis,以至于使用插件来增强 MyBatis,比如 Mybatis-PageHelper,一个通用的 MyBatis 分页插件。想不到 MyBatis 还挺灵活,支持插件机制。仔细翻阅官方文档可以确定 MyBatis 允许你在 Mapper 执行过程中的某些点拦截调用,已经知晓动态代理的朋友们(参见切面和动态代理以及字节码),彷佛看透了 MyBatis 插件。
默认情况下,MyBatis 允许插件拦截以下方法的调用:
| Classes | Methods |
|---|---|
| Executor | update, query, flushStatements, commit, rollback, getTransaction, close, isClosed |
| ParameterHandler | getParameterObject, setParameters |
| ResultSetHandler | handleResultSets, handleOutputParameters |
| StatementHandler | prepare, parameterize, batch, update, query |
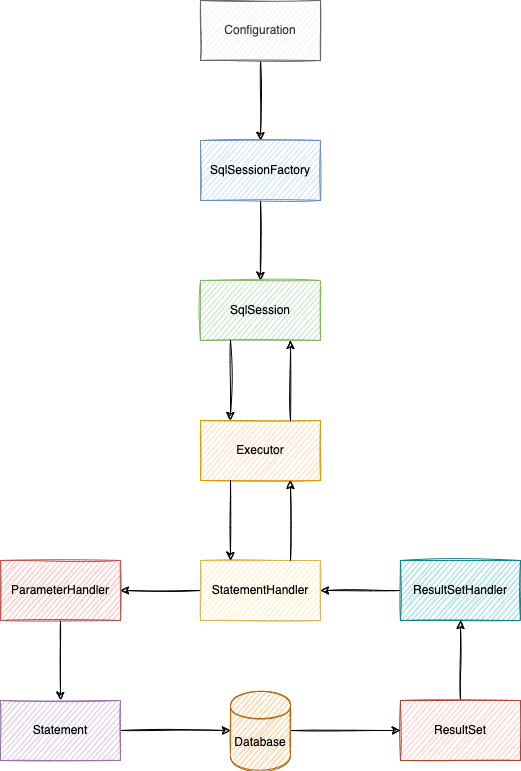
顾名思义,MyBatis 不愧为 SQL 映射框架。这些重要的组件共同参与了 MyBatis 一般的工作流程:
示例插件
编写一个插件,只需要实现 org.apache.ibatis.plugin.Interceptor 接口,指定你要拦截的方法签名。
@Intercepts({
        @Signature(
                type = Executor.class,
                method = "query",
                args = {MappedStatement.class, Object.class, RowBounds.class, ResultHandler.class}
        )
})
public class ExamplePlugin implements Interceptor {

    @Override
    public Object intercept(Invocation invocation) throws Throwable {
        System.out.println("implement pre-processing if needed");

        Object result = invocation.proceed();
        System.out.printf("result: %s\n", result);

        System.out.println("implement post-processing if needed");
        return result;
    }

    @Override
    public void setProperties(Properties properties) {
        System.out.printf("properties: %s\n", properties);
    }
}
@Intercepts 必不可少,其中 @Signature 声明方法签名数组,上面这个简单的插件用于拦截 Executor 的参数类型列表为 (MappedStatement.class, Object.class, RowBounds.class, ResultHandler.class) 的 query 方法,在此方法调用前做预处理,在此方法调用后做后处理。
拦截 Executor 的 query 方法是否真能对 Mapper 方法调用起作用?且让我们先在 mybatis-config.xml 中声明自定义插件:
<plugins>
    <plugin interceptor="io.h2cone.mybatis.interceptor.ExamplePlugin">
        <property name="someProperty" value="1024"/>
    </plugin>
</plugins>
准备一个简单的 Mapper,模拟通过省区代码查询城市列表:
public interface CityMapper {

    @Select("select * from city where province_code = #{provinceCode}")
    List<City> selectCities(String provinceCode);

}
编写用例测试一下我们的插件:
@Test
public void testExamplePlugin() throws IOException {
    String resource = "mybatis-config.xml";
    InputStream inputStream = Resources.getResourceAsStream(resource);
    SqlSessionFactory sqlSessionFactory = new SqlSessionFactoryBuilder().build(inputStream);

    try (SqlSession session = sqlSessionFactory.openSession()) {
        CityMapper mapper = session.getMapper(CityMapper.class);
        List<City> cities = mapper.selectCities("000000");
        Assert.assertNotNull(cities);
    }
}
运行测试代码输出如下:
properties: {someProperty=1024}
implement pre-processing if needed
result: []
implement post-processing if needed
可见我们的预处理和后处理成功插入了 Mapper 方法调用之前和之后,完整代码请看 mybatis-interceptor。
知其所以然
MyBatis 如何实现插件?瞧瞧 MyBatis 源码也许能找到答案。先从 testExamplePlugin 这个测试方法开始,从表面上看,分成几步:
-
加载 XML 配置文件
-
从 XML 构建
SqlSessionFactory -
使用
SqlSessionFactory打开SqlSession -
查询数据库
解析 XML 配置后加载插件是否发生在第二步?层层探索源码之后,留下了一些蛛丝马迹:
-
org.apache.ibatis.session.SqlSessionFactoryBuilder#build(java.io.InputStream)
-
org.apache.ibatis.session.SqlSessionFactoryBuilder#build(java.io.InputStream, java.lang.String, java.util.Properties)
-
org.apache.ibatis.builder.xml.XMLConfigBuilder#XMLConfigBuilder(java.io.InputStream, java.lang.String, java.util.Properties)
-
org.apache.ibatis.builder.xml.XMLConfigBuilder#XMLConfigBuilder(org.apache.ibatis.parsing.XPathParser, java.lang.String, java.util.Properties)
-
org.apache.ibatis.builder.xml.XMLConfigBuilder#parse
-
org.apache.ibatis.builder.xml.XMLConfigBuilder#parseConfiguration
-
org.apache.ibatis.builder.xml.XMLConfigBuilder#pluginElement
-
org.apache.ibatis.session.Configuration#addInterceptor
-
org.apache.ibatis.plugin.InterceptorChain#addInterceptor
-
org.apache.ibatis.plugin.InterceptorChain#addInterceptor
由此看来,自定义插件会添加到 org.apache.ibatis.plugin.InterceptorChain#interceptors:
public class InterceptorChain {

  private final List<Interceptor> interceptors = new ArrayList<>();

  public Object pluginAll(Object target) {
    for (Interceptor interceptor : interceptors) {
      target = interceptor.plugin(target);
    }
    return target;
  }

  public void addInterceptor(Interceptor interceptor) {
    interceptors.add(interceptor);
  }

  public List<Interceptor> getInterceptors() {
    return Collections.unmodifiableList(interceptors);
  }

}
这种设计是 Chain-of-responsibility pattern。注意 pluginAll 方法,终于还是回到了 Interceptor:
public interface Interceptor {

  Object intercept(Invocation invocation) throws Throwable;

  default Object plugin(Object target) {
    return Plugin.wrap(target, this);
  }

  default void setProperties(Properties properties) {
    // NOP
  }

}
注意 plugin 方法,再点开 org.apache.ibatis.plugin.Plugin#wrap 方法,果然 MyBatis 插件基于 JDK 动态代理来实现:
public class Plugin implements InvocationHandler {

  private final Object target;
  private final Interceptor interceptor;
  private final Map<Class<?>, Set<Method>> signatureMap;

  private Plugin(Object target, Interceptor interceptor, Map<Class<?>, Set<Method>> signatureMap) {
    this.target = target;
    this.interceptor = interceptor;
    this.signatureMap = signatureMap;
  }

  public static Object wrap(Object target, Interceptor interceptor) {
    Map<Class<?>, Set<Method>> signatureMap = getSignatureMap(interceptor);
    Class<?> type = target.getClass();
    Class<?>[] interfaces = getAllInterfaces(type, signatureMap);
    if (interfaces.length > 0) {
      return Proxy.newProxyInstance(
          type.getClassLoader(),
          interfaces,
          new Plugin(target, interceptor, signatureMap));
    }
    return target;
  }

  @Override
  public Object invoke(Object proxy, Method method, Object[] args) throws Throwable {
    try {
      Set<Method> methods = signatureMap.get(method.getDeclaringClass());
      if (methods != null && methods.contains(method)) {
        return interceptor.intercept(new Invocation(target, method, args));
      }
      return method.invoke(target, args);
    } catch (Exception e) {
      throw ExceptionUtil.unwrapThrowable(e);
    }
  }

...
如代码所说,把插件要拦截的方法所属的类的实例当作被代理(target),满足条件时生成了代理(proxy)。举例来说,Executor 接口的实现类都是被代理类,它们对应的代理类都实现了 Executor,一旦 Executor 的实现类的方法被调用时,偷天换日,实际调用的则是 org.apache.ibatis.plugin.Plugin#invoke 方法,其中调用了 ExamplePlugin 重写的intercept 方法,因此,我们才能在 Executor 实现类方法调用前后插入预处理和后处理。
那么,org.apache.ibatis.plugin.InterceptorChain#pluginAll 方法什么时候被调用?继续深入测试代码第三步的源代码:
-
org.apache.ibatis.session.SqlSessionFactory#openSession()
-
org.apache.ibatis.session.defaults.DefaultSqlSessionFactory#openSession()
-
org.apache.ibatis.session.defaults.DefaultSqlSessionFactory#openSessionFromDataSource
-
org.apache.ibatis.session.Configuration#newExecutor(org.apache.ibatis.transaction.Transaction, org.apache.ibatis.session.ExecutorType)
-
org.apache.ibatis.plugin.InterceptorChain#pluginAll
当然,我们也可以利用 IntelliJ IDEA CE 的代码分析功能,查一下哪里使用了 pluginAll 方法:

从终点出发,回到了起点。
尾声
大胆猜想一下,分页插件是通过拦截 StatementHandler 的 query 等方法,取得 SQL,改写 SQL 使其能够分页、求总记录数、排序。除了分页,MyBatis 插件理所当然可以做慢 SQL 监控、水平分表、数据加密和解密、菜单权限控制……
本文首发于 https://h2cone.github.io/