造你自己的 HTTP 代理
前面的话
最近在亲近 Rust 生态,注意到 Cloudflare 开源了用于构建快速和可靠以及可演进的网络服务库 Pingora,了解了“最少必要知识”后,决定尝试基于 Pingora 构建 HTTP 代理服务来代替私有服务器上的 Caddy。

老弟我的服务器配置文件 Caddyfile 类似于:
:8008

route /json {
    reverse_proxy node1:8090 node2:8090
}
简言之,Caddy 会监听端口 8008 的 HTTP 请求,若请求 URI 为 /json,则将请求转发到上游 node1 或 node2 的后端服务。
upstream backend {
    server node1:8090;
    server node2:8090;
}

server {
    listen 8008;

    location /json {
        proxy_pass http://backend;
    }
}
准备工作
使用 Cargo 新建项目:
.
├── Cargo.toml
├── .gitignore
├── README.md
└── src
编辑 Cargo.toml 配置项:
[package]
name = "gatekeeper"
version = "0.1.0"
edition = "2021"

[dependencies]
async-trait = "0.1"
clap = { version = "3.2.25", features = ["derive"] }
env_logger = "0.11.5"
openssl = { version = "0.10.66", features = ["vendored"] }
pingora = { version = "0.3.0", features = ["lb"] }
主要过程
Pingora 提供了一个 pingora::proxy::ProxyHttp 特性 (trait),我们可以在 src/main.rs 中通过实现这个接口来构建自己的 HTTP 代理服务。
pub struct Ctx();

#[async_trait]
impl ProxyHttp for Gateway {
    type CTX = Ctx;

    fn new_ctx(&self) -> Self::CTX {
        Ctx()
    }

    async fn upstream_peer(
        &self,
        _session: &mut Session,
        _ctx: &mut Self::CTX,
    ) -> pingora::Result<Box<HttpPeer>> {
        let upstream = self.lb.as_ref().unwrap().select(b"", 256).unwrap();
        let peer = HttpPeer::new(upstream, self.tls, self.sni.to_string());
        return Ok(Box::new(peer));
    }

    async fn request_filter(
        &self,
        _session: &mut Session,
        _ctx: &mut Self::CTX,
    ) -> pingora::Result<bool>
    where
        Self::CTX: Send + Sync,
    {
        if _session
            .req_header()
            .uri
            .path()
            .starts_with(self.ctx_path.as_str())
        {
            return Ok(false);
        }
        let _ = _session.respond_error(404).await;
        return Ok(true);
    }
}
对于 Pingora 来说,请求(request)有生命周期,在开发者面前则是一组生命周期函数,从请求发起到完成期间框架会阶段性回调。函数 upstream_peer 用于创建上游(upstream)连接,由于上游有多个,我们需要一个负载均衡器 lb 来选择,这里使用了 Round-Robin 算法,入参无关紧要。函数 request_filter 用于过滤请求,我们只是简单地检查请求的 URI 是否匹配,若是则表示不拦截或放过,否则响应错误码 404。
其中 #\[async_trait\] 是实现 ProxyHttp 的编译时要求,Async trait methods 提供了这个宏(macro)用于使在 Trait 中的 async fn 与 dyn Trait 一起工作。
实现 ProxyHttp 的结构体 Gateway 的定义如下:
#[derive(Parser)]
pub struct Gateway {
    #[clap(skip = None)]
    lb: Option<Arc<LoadBalancer<RoundRobin>>>,
    /// Context path
    #[clap(long = "cp", default_value = "/")]
    ctx_path: String,
    /// Upstream address
    #[clap(long = "ua")]
    upstreams: Vec<String>,
    /// TLS
    #[clap(long)]
    tls: bool,
    /// SNI
    #[clap(long, default_value = "")]
    sni: String,
    /// Health check frequency in seconds
    #[clap(long = "hcf", default_value = "0")]
    hc_freq: u64,
}
Pingora 提供了一些命令行参数,当需要拓展命令行参数时,其中不很优雅的选项是 clap 的扁平化(flatten)。紧接着使用另一个结构体 App 包装 Gateway,这样才能在主函数 main 中通过函数 http_proxy_service 创建 HTTP 代理服务:
fn main() {
    env_logger::init();

    let app = App::from_args();
    let mut server = Server::new(Some(app.opt)).unwrap();
    server.bootstrap();

    let mut gateway = app.gateway;
    let mut lb = LoadBalancer::<RoundRobin>::try_from_iter(&gateway.upstreams).unwrap();

    if gateway.hc_freq > 0 {
        let hc = health_check::TcpHealthCheck::new();
        lb.set_health_check(hc);
        lb.health_check_frequency = Some(Duration::from_secs(gateway.hc_freq));

        let background = background_service("hc", lb);
        let task = background.task();
        gateway.lb = Some(task);

        server.add_service(background);
    } else {
        gateway.lb = Some(Arc::new(lb));
    }
    let mut proxy = http_proxy_service(&server.configuration, gateway);
    proxy.add_tcp(app.bind_addr.as_str());

    server.add_service(proxy);
    server.run_forever();
}
由于 http_proxy_service 会夺取 Gateway 的所有权(ownership),因此延后它的调用。在主函数中,我们初始化了一个 Server,然后创建了一个 Gateway,接着初始化了一个 LoadBalancer,最后将 Gateway 和 LoadBalancer 传递给 http_proxy_service。至此,我们的 HTTP 代理服务就构建完成了,完整的代码可以在 Gatekeeper 找到。
负载测试
似乎 wrk 的报告不太详细,因此使用 HTTP 负载测试工具 oha 测试 Caddy 和 Gatekeeper 以及 Nginx 反向代理后端服务时应对 HTTP/1.1 负载增加的能力,重点关注吞吐量 requests/sec 和 P99 延迟。
oha --no-tui -c 400 -z 30s http://node0:8008/json
从客户端 node3 打开 400 条连接向 node0 发送请求持续 30 秒,分析结果如下所示:
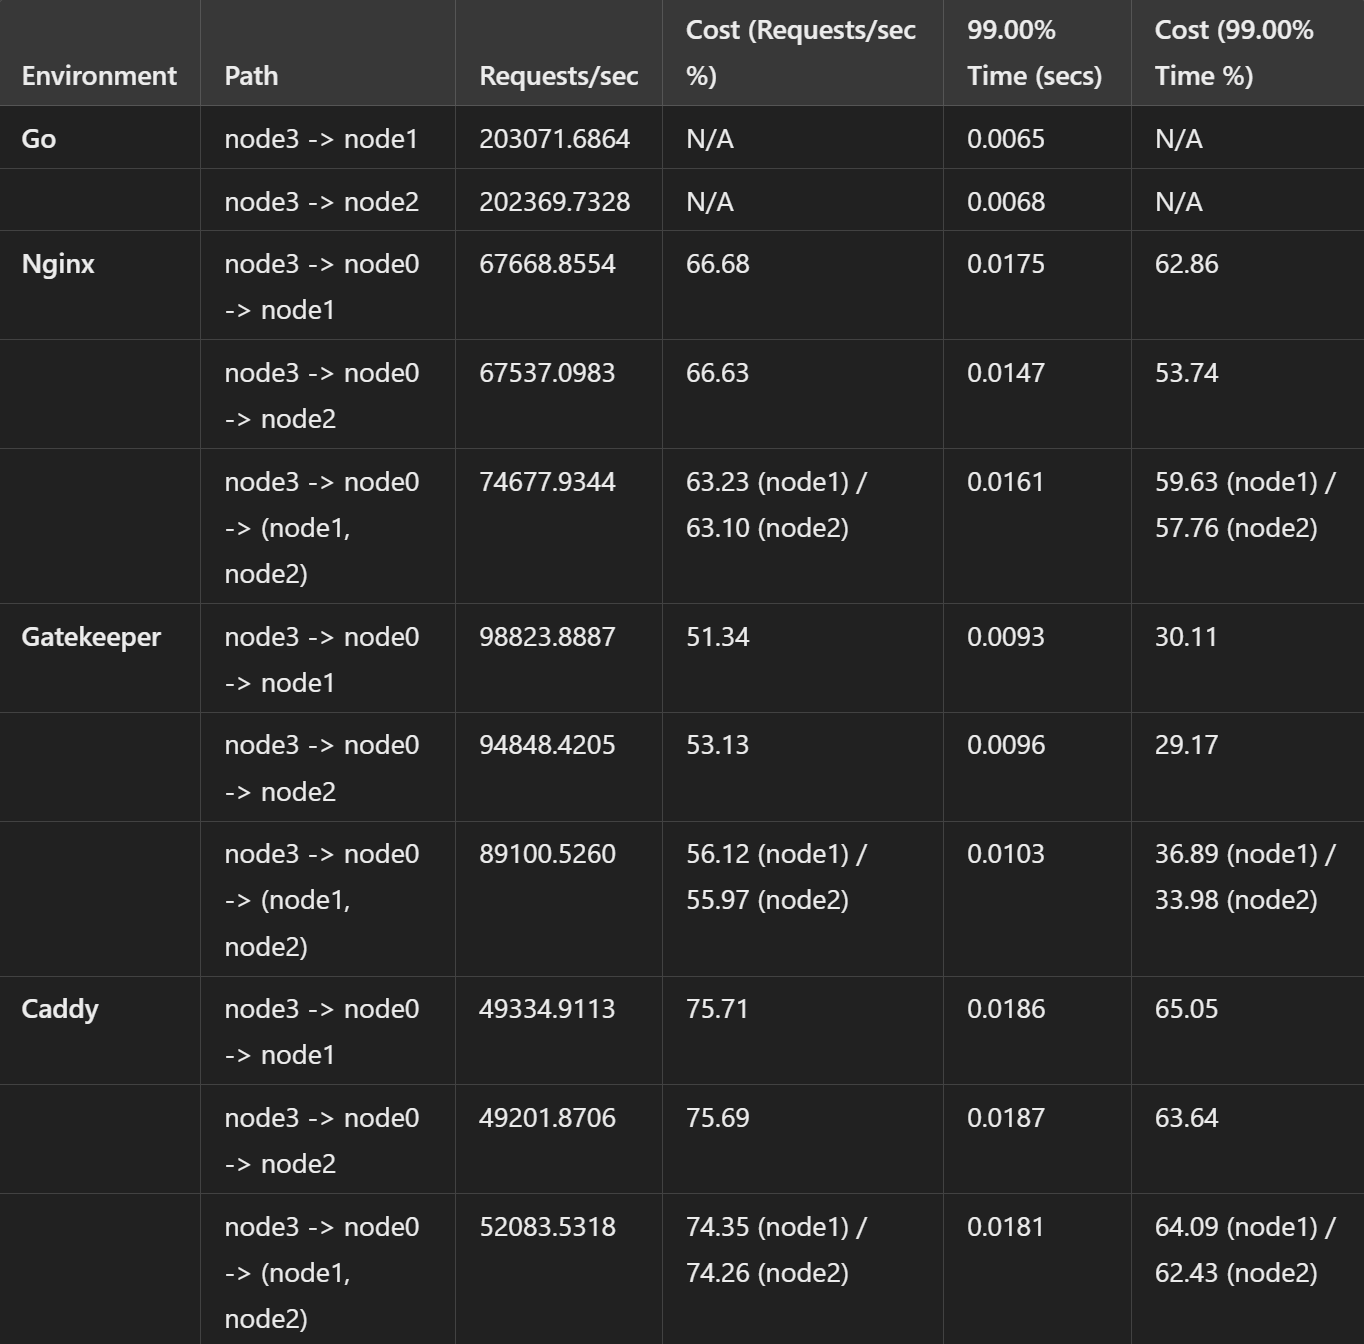
这张表汇总了 4 组环境的性能指标,并计算了它们相对于基准的成本百分比。总体来看,以 Go 作为基准,Gatekeeper 相对于 Caddy 或 Nginx 来说,反向代理性能下降更少!
智能总结
本文介绍了如何使用 Pingora 构建 HTTP 代理服务,并将它与 Caddy 和 Nginx 在私有服务器的性能表现进行对比。在实际生产环境中,我们可能会遇到更多的问题,比如安全性、稳定性、可扩展性等,这些都需要我们不断地去探索和实践。
本文首发于 https://h2cone.github.io/